

4 Genius Ways to Find a Stud in the Wall Without Losing Your Mind
Posted by MagNate-O on Apr 2nd 2025
Looking for studs? No, not that kind—we’re talking about the kind hiding behind your drywall, the ones you need to mount your new TV properly! Whether you’re a first-time DIY-er or a seasoned pro, learning how to find studs is a must-have skill. Why? Because nailing, drilling, or hanging anything without hitting a stud often ends with dramatic wall cracks and bruised egos (we’ve all been there).
But guess what? Finding studs doesn’t require professional-level tools or wall-destroying intuition. With the right tricks (and a little humor), you’ll be mastering the art of stud-spotting in no time.
Why Finding a Stud Matters
Before we break this down, let's clear something up. Mounting flat-screen TVs, heavy-duty shelves, or grandma’s priceless mirror requires more than drywall support. Drywall alone can’t handle much weight, so you’ll want to anchor into a sturdy stud for some reliable support. Think of studs as the backbone of your wall. Trust us; the headache of finding one is worth it—even if it feels like a game of hide-and-seek.
Now, grab your tools and get ready to meet the four most effective ways to find studs without accidentally hammering your finger.
(Also, we made a cool video tutorial that shows these tricks in action if you’re more of a visual learner!).
Method 1️⃣ Stud Finder: The Magic Wand of Stud Search
Let's start with the easiest option. A stud finder is basically the Slytherin wand of wall exploration. Available at any hardware store (or online), this nifty device scans your wall for density changes and beeps when you hit paydirt (aka, a stud).

How to Use It:
- Place the stud finder on your wall and switch it on.
- Slide it horizontally across the wall until it starts beeping or lighting up.
- Mark the stud’s location with a pencil or tape (because no one likes guessing games twice).
Stud Finder Pro Tip:
Invest in a basic but reliable digital stud finder. You don’t need anything too fancy, but avoid the bargain-bin options. They often beep at emotional support screws that aren’t actually on the stud.
Method 2️⃣ The “Shine a Light” Trick
Cue the dramatic superhero music because your flashlight is about to save the day! This method is shockingly simple (and oddly satisfying). Your drywall is held in place by screws or nails, and by shining a flashlight at an angle, you’ll spot subtle bumps, patches, or dimples where screws or nails attach to a stud.

Here's How:
- Hold your flashlight at just the right angle along the wall surface.
- Inspect for tiny indentations (these often align vertically with the studs).
- Mark the stud with chalk or pencil, and voilà! You’re officially a detective.
Who’s This For?
This trick is perfect if you don’t have specialized tools or if you love the thrill of solving mini mysteries.
Method 3️⃣ Magnet Magic
No stud finder? No problem. Grab a strong magnet (not the one holding your fridge's boring grocery list) and start exploring those walls. Why does this work? Steel screws and nails are embedded in studs, and your magnet will cling to them like peanut butter to jelly.

The Steps:
- Use a small yet powerful magnet (bonus points if it’s one of those neodymium ones).
- Move it steadily across your wall until it "sticks" or feels a pull.
- Once it finds a screw or nail, you’re on to a stud! Mark this location.
Fun Side Note:
Magnets are also a great hobby…if you’re into ghouls and milk steak (shoutout to all "Always Sunny in Philadelphia" fans reading this).
Method 4️⃣ Tape Measure & Outlet Combo
Here’s a little industry secret about power outlets and studs. Electrical outlets are almost always mounted directly on a stud for stability. By locating an outlet, you can use a trusty tape measure to map out the stud and even its neighbors.
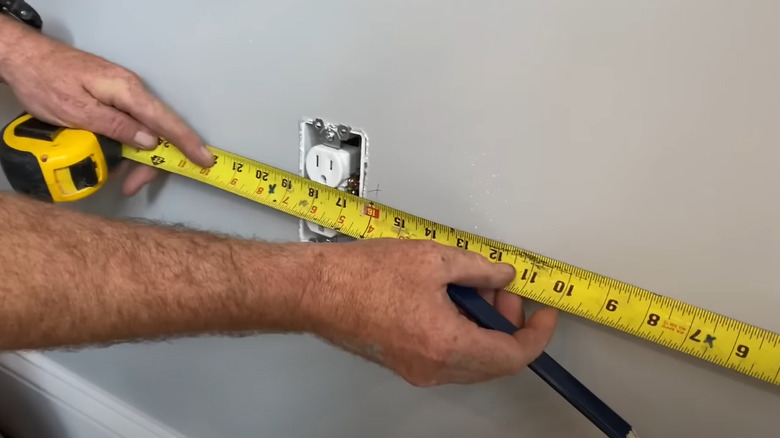
Step-by-Step Guide:
- Find an electrical outlet or light switch near where you need the stud.
- Unscrew the cover plate and peek inside to see which side of the outlet the stud is on. (Don’t touch the wiring!)
- Measure 16 inches in either direction since most studs are spaced 16 inches apart. For older homes, check for 24-inch spacing.
- Mark your potential stud points, and you’re golden.
Time-Saving Tip:
Combine this method with your magnet or flashlight to double-check your measurements. Accuracy is your BFF when mounting valuable items!
Pro Tips for Zero Stress Stud Finding
- Tap the Wall. Ever heard of the classic “knock and listen” game? It’s true that walls sound hollow between studs and solid over them. However, this method takes practice and works better as a backup rather than a solo tactic.
- Mark as You Go. Plan to hang several items along the same wall? Mark all your studs in one go with painter’s tape, so you always know where to drill next.
- Avoid Plumbing & Wires. If your house resembles a daytime soap opera, you can bet there’s drama behind the walls (water pipes and wiring, looking at you). Use caution, especially when you’re near water fixtures.
Wrapping It Up
That’s it, folks! By now, you’ve mastered the art of finding wall studs like a pro (or at least a very savvy DIY-er). Whether you’re using magnets, lights, or trusty tools, the key is patience, practice, and a pinch of humor.
If you’re ready to take the next step, check out our full video guide and see these stud-finding methods in action. And don’t forget to explore our mount options for a setup that looks just as sharp as you.
Now go forth and find those studs! (The wall kind. Sorry, we can't help with dating.)